Everything a Web Designer Should Know About Google Fonts API
Typography is the most valuable asset of your blog. It doesn’t matter if you have a colorful design blog, an awesome web magazine or a plain simple blog. The main focus always stays on the content and the readability of your text. And that’s where the importance of good typography comes. Well, in this article, I’m not going to give you tips upon good typography (as we already have some good tips on that thing) but, I’m going to explain and implement a rather new and innovative concept from Google that aims at providing a helping hand to all web designers and web masters out there.
The thing which I’m going to tell you about is, Google’s new fonts API. For those of you, who don’t know what an API is, have a look. After you are done with the concept of API (it isn’t that hard to grasp). The new font API is all about CSS magic. And that too, without overloading your web server. Let’s see how its presently done and how Google API attempts to change it.
Right now, when you use a particular font type on your web page, the font has to be downloaded upon every page request that goes on your server. If the user hasn’t visited the page before and doesn’t have any cached typefaces, the browser would automatically do the stuff in background. But, this takes a little time. And when the audience is huge, even a micro second can make huge differences. Here’s how, Google’s Font API come to the rescue.
If you use Google’s Open Font’s API, you have many advantages like:
- 1. Huge collection of Font Typefaces to choose from Google’s Fonts library.
- 2. All the bandwidth load is on Google as you are only using their resources in the API.
- 3. The speed is blazing fast as Google’s CDNs are faster than your site.
- 4. You can hotlink the font file so that there is a less file and bandwidth request.
Apart from that, the fun element of doing something different is always there. Anyways, I’ll show you an example on how the Google Font API can be implemented on your blog.
First, I’ll be providing you with a basic wireframe that would act as our base layout for further experimenting and adding the font typefaces (here’s a live demo of what you’ll get).
Start with a plain text file in your favorite text editor and copy the following code into it:
<html>
<head>
<title> Google API Demo</title>
<link rel="stylesheet" media="screen" href="style.css" />

</head>
<body>
  <div id="container">

	    <div id="content">
	    	<h1>This is an example implementation of Google Fonts API</h1>
	    </div>

	    	    </div>
	       </div>
</body>
</html>
Creating the Styling CSS
The basic layout CSS:
* {
  margin: 0;
  padding: 0;
}

body {
  background: #a3eed3;
}
The Content CSS:
#content {
	width: 1000px;
	margin: auto;
	margin-bottom: 10px;
}
#content h1 {
	text-align: center;
	font-size: 4em;
	color: #111;
	text-shadow: 0px 2px 3px #555;
}

Alright. Now we have created a basic wireframe upon which , we’ll be implementing the Google Fonts API standards. To play around, just head on to Google’s Font API page and go to Google Font Directory.
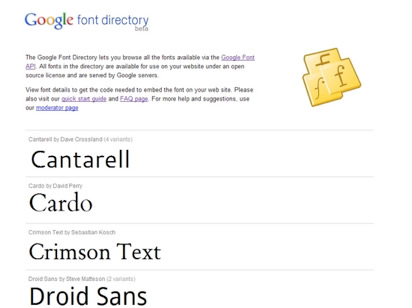
You’ll see a list of fonts with the number of variants in superscript. Click on any one you like. For instance, I’ve chosen the Lobster font family for this example
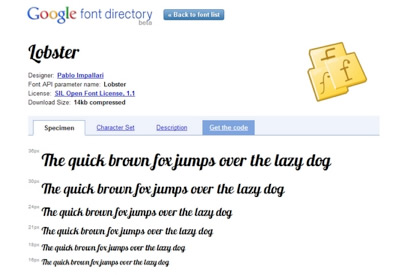
After that, click the Get the Code button on the top navigation bar and you’ll get two codes:
- 1. A CSS file hotlinking code.
- 2. A font family code, which you have to embed in your local CSS file.
Now, place the first code in the header section of the wireframe prototype we just created (along with the code to link your local CSS) and use the other code from Google’s font API to add to the heading section of your CSS.
In our example, we have used the following code:
<link href='http://fonts.googleapis.com/css?family=Lobster' rel='stylesheet' type='text/css'>
Now, the heading section should look like this:
#content h1 {
	text-align: center;
	font-size: 8em;
	color: #111;
	text-shadow: 0px 2px 3px #555;
	font-family: 'Lobster', arial, serif;
}
Save and reload your page and voila! You should now see something like this:
See, you’ve imported a font typeface with just few lines of codes and all load is on Google! The possibilities are endless as long as you go with your creativity. The Google Font API is still in beta stage and lots of improvements and font face additions need to be done in near future. If you have any difficulty in doing anything, do drop in a comment below.