How To Design a Simple half-fold Business Brochure in Photoshop
This guide will help you design a simple half-fold brochure using Adobe Photoshop. We will be using a few basic tools and styles so it should not be too difficult.
Step 1
Upon opening Adobe Photoshop, create a new document by going to File->New… In the window that opens. You will then be asked to enter the dimensions of your design. This can vary depending on the brochure size you wish to use but for the sake of our tutorial, let us use a standard 1100x600px design canvass. ALSO take note to raise the resolution value to at least 300ppi to ensure a crisp and clear brochure design. Also change the color mode to CMYK if you wish to print your brochure through a commercial printer.
Step 2
With the new document open, bring up the rulers first by pressing CTRL+R. Now, from the left hand side ruler, click and drag a guideline to your canvass. It should be a light blue line. Position it at the center of our document at 550px away from the left or right edge of the document.
Step 3
Great! Now, the first thing that we will work on in our brochure is its background. While it would be simple enough to use a white background, it is not recommended as it will make the brochure too boring and of course will hamper its performance. The best type of background these days for brochures and many other print designs is a gradient color background. To apply this simply use the gradient color tool in Adobe Photoshop. Simple set two colors as your foreground and background color and then use the gradient tool to apply a seamless color changing background for your layout.
Step 4
The next step is adding a watermark image. Most business brochures and other classic and formal type brochures use watermark images. This is a nice way to populate your background with a texture, without making it too complicated for the design. It is very simple enough to do this. Simply copy and paste the image that you want to use as a watermark on top of our gradient background. Scale it correctly of course by pressing CTRL+T and then increasing/decreasing its size while holding the shift key. If it has color, it is best to de-saturate the image by pressing CTRL+SHIFT+U.
Step 5
To make the image truly a watermark, we change its blend mode. Do this by looking at its layer details in the layer panel and changing its blend mode from Normal to “Overlay”. Then reduce its opacity to 20%. This should make it a true watermark integrated with our gradient color background.
Step 6
Once done, now would be a good time to save your new document. This will be our base template for our brochure design (both front and back). Save it first as a template and the backup. Then, save it again with a name marking it as the front cover design for our brochure.
Step 7
Great, now we start designing the front or outer cover of our brochure first. Remember that in printing, the front design of the brochure has the cover of the brochure on the right, and the “back” cover of the brochure on the left. This is considering this design will be folded of course. So we start with the front cover on the right panel. Here we used the elliptical shape tool to create a white circle where we will put the company logo. Hold down the shift key as you inscribe the circle to constrain its proportions.
Step 8
We then duplicate this circle by pressing CTRL+J. We change its color to a theme color and then reduce its size a bit by pressing CTRL+T and then just adjusting the dimensions via the anchor points. To make things easier on you, hold down the SHIFT key and the ALT key as you do the resizing and you will see that the new shape will be centered as well as constrained with its dimensions in the process.
Step 9
Repeat the process 2 more times to get a nice modern looking shape set. In this example we used different theme colors to get this nice effect.
Step 10
To create a nice glow effect, create a new white circle on top of our other circles. Then rasterize this layer by right clicking on the shape layer and selecting the option to “rasterize”. Using a large and soft eraser brush, we erase the top part of the circle.
Step 11
Then reduce the opacity of this layer to add that glossy sheen look. Here we reduced it to around 15%.
Step 12
Then, we paste in the company logo for the brochure within the circle. In this kind of design, it is best to use a white color for the logo in silhouette form. For our example, we just use some of the custom shapes in Photoshop through the custom shape tool, but for your design of course, it should be your main logo or your main feature image for the brochure. We grouped all of these into their own layer group named “circle”. You can create layer groups by clicking on the “new layer group” icon on the bottom of the layers panel and then dragging all the layers that you want in that group folder.
Step 13
Next, we add some stripes. We use the rectangle shape tool to create four striped colors that span the whole width of our design. Of course, we purposefully aligned them so that it passes through and behind our circle shapes with the logo. We also grouped them into their own layer group so that they are easier to move together.
Step 14
We duplicate the stripe group by just selecting the group folder, right clicking on it and clicking on the option to “duplicate group”. Once duplicated, we press CTRL+T on the duplicate group to transform it. Right click on the group and select the transform option “Rotate 90 degrees CW”. This gives us a vertical stripe. We have positioned it here adjacent and behind our circular logo.
Step 15
Great! Now we will finalize the stripes and logo. Make sure to give a final look to the positions of your stripes and logos. Adjust them as necessary of course. It should be easy as they are grouped already. Once you are satisfied with their locations, right click on one of your stripe groups or the circle group and then select the option to “merge groups”. Do this for each of the groups we created.
Step 16
Double click on one of our stripes layers to bring up its layer style options. Click on the option “pattern overlay”. Set the blend mode to Multiply and the opacity to 70%. Then, choose the Charcoal Flecks pattern as the pattern for this option If you do not see this, click on the right arrow beside the patterns list and select “grayscale paper”. This should help you see the “Charcoal Flecks” option. Once done, do the same for your other stripe.
Step 17
The end result should be a slightly more interesting looking stripe set.
Step 18
Great! Now, we just type in the title and other supporting text for the brochure cover. Use the text type tool of course to do this. Note that you can easily adjust the spacing and other attributes of text by looking at the character panel and adjusting the values as necessary.
Step 19
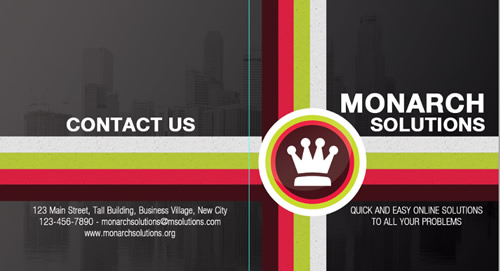
Of course, we also write in the text content for the back cover of our brochure. Just use the same color and font style that you used on the front cover to keep things consistent.
Step 20
Great! That finishes our front design. It should look more or less like this. Take note of where the guideline is (light blue line) which should tell you where the fold should occur. Save this design of course as the front cover of your brochure.
Step 21
Now, we work on the back design or the inner panels for the brochure. There are two ways to start out with this. One is to use the template we saved earlier, or two, use our current design, but of course save it in another file name. The easiest of course is to save it as another file and mark is as the inner panel design. So we saved the new document as the inner panels of our half fold brochure. We then remove the visibility of all the elements leaving the background just so that we have a clean slate to start on.
Step 22
Good! Now, we make the stripes visible again. This time we select both and press CTRL+T to activate the transformation. Then we right click on the stripes and select the option to “Flip Horizontal”. This allows our stripes to match and continue the stripes from the other side.
Step 23
Next, we type in the inner content. It is best to use the same font styles as the front, but of course of a smaller size. Of course make sure to distinguish between the headlines and the main text.
Step 24
We then unhide the circle logo we created for the front cover design. We scale it down and duplicate it several times to become our bullets for the list content. Alternatively, you can search for your own styled bullet shape using the custom shape tool.
Step 25
Now, using the rectangle shape tool create a few more white rectangles for the bottom of our design. These will be the base for images.
Step 26
Great! Now, we paste in an image in front of each of these rectangles. Our image sources are here:
- http://www.flickr.com/photos/76266195@N08/6939482080/sizes/z/in/photostream/
- http://www.flickr.com/photos/30182867@N05/6447504471/sizes/l/in/photostream/
- http://www.flickr.com/photos/marcinmonko/6172327422/sizes/l/in/photostream/
- http://www.morguefile.com/archive/display/644927

Step 27
We then merge each image with its white rectangle by just selecting both and then right clicking on them to choose the merge layers option. Afterward, press CTRL+T and rotate these images creatively.
Step 28
Now, double click on one of our images. Then on the layer styles window that opens, click on the option for “drop shadow”. Change the distance to 10 and the size to 15.
Step 29
Then, just apply the same layer style to all those other images. You can easily copy existing layer styles by just right clicking on the layer with the style and selecting the option to copy the layer style. Then you just select where you want to paste the layer style, right click on them and then just select the option to paste in the style information.

Step 30
Finally, to add some emphasis on our sub headlines, we use a rectangle tool to inscribe a rectangle shape just behind them. Make sure you use a theme color for this.
Step 31
Then, change the blend mode to overlay, to proper integrate the color rectangle with the design.
Step 32
Repeat the process this time using more rectangles of a different color. Overlap them with each other for a creative style effect.

Step 33
Great! That should finish our half- fold brochure! Hope you learn a lot from this guide. Below are the final images for the front and back design of our half fold brochure.