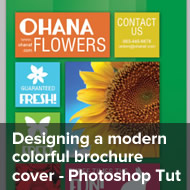
Design a website layout in photoshop – PORTFOLIA
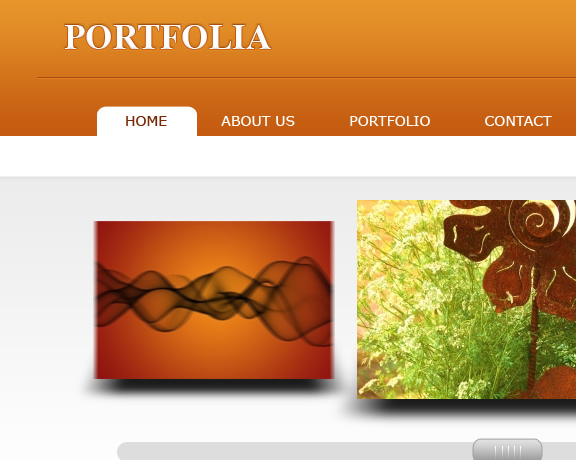
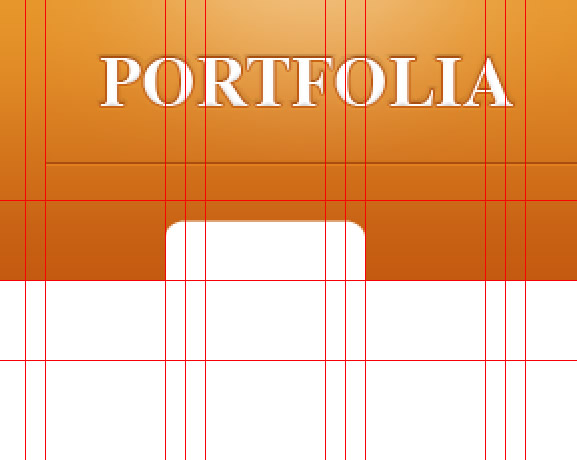
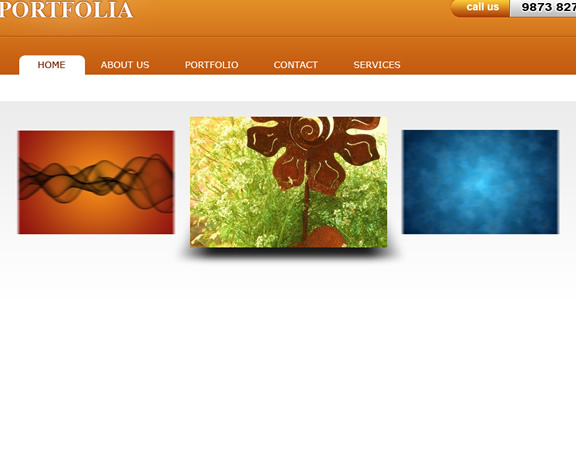
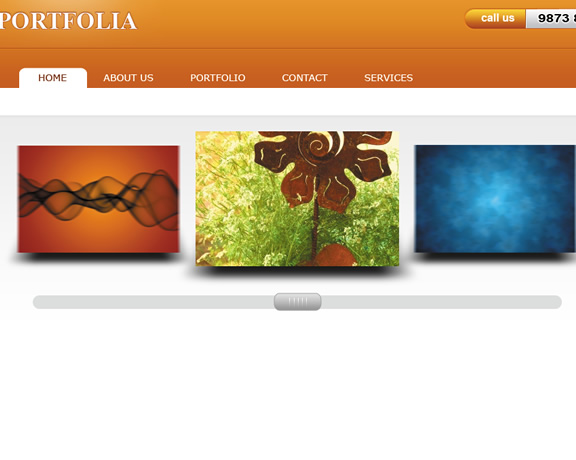
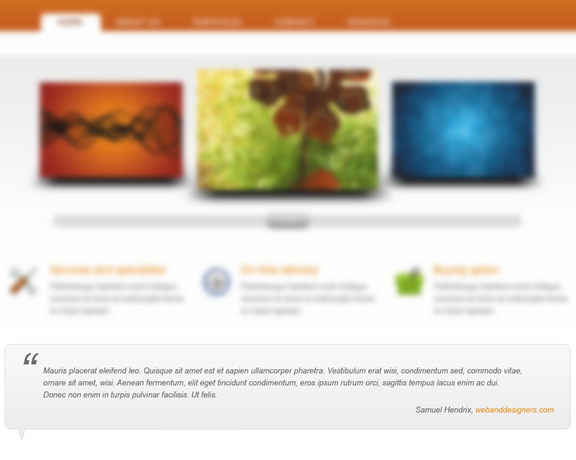
In this photoshop tutorial we will learn to design a clean website layout. 960 grid system is what we are going to use in this tutorial and lots of photoshop techniques will be dealt as we go through. Before starting, here is final preview of the photoshop layout. If you also need a functional and visually-appealing business website like hargatoto, be sure to seek professional web development services.
Enter your email and download it now!
Enter your email address and the download link will be sent right to your inbox.

Step 1: Add the 960 grid
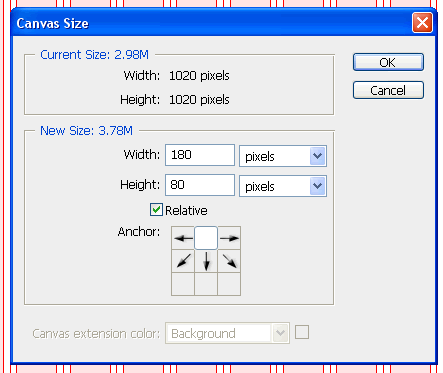
Alignment is essential for any sort of design. We will use 960s Grid system which you can download it from here. Once file is downloaded open 960_grid_12_col.psd which is within photoshop folder. Usually the document size is 1080 X 1080 px but we need 1200 X 1100 px for our template. To change the template size go to Image -> Canvas size, input 180 width and 80 height and select top arrow. This will make the template 1200 X 1100 px. To fill the background layer with white color, select background layer, press Shift + backspace and fill it with white.
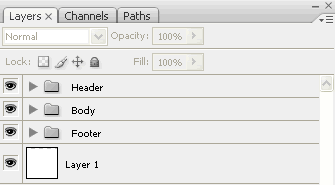
Step 2: Folder structure
I like to maintain structure while designing anything and like you to do so. Divide this design into 3 part (Header, Body and Footer). To implement this create three folder with name Header, Body and Footer in layer palette. We will work on each section step by step: first on header, then body and finally on footer.
Head Section
Step 3: Add gradient background on header
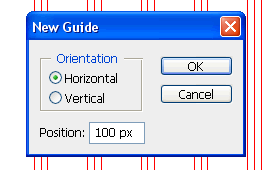
Before adding gradient background we will add guide lines. Click View -> New Guide, select horizontal and input 100 for position. Repeat same step to add guide line of 140px and 180px.
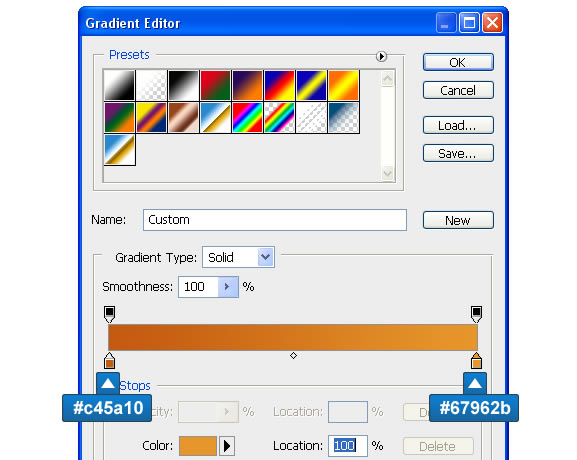
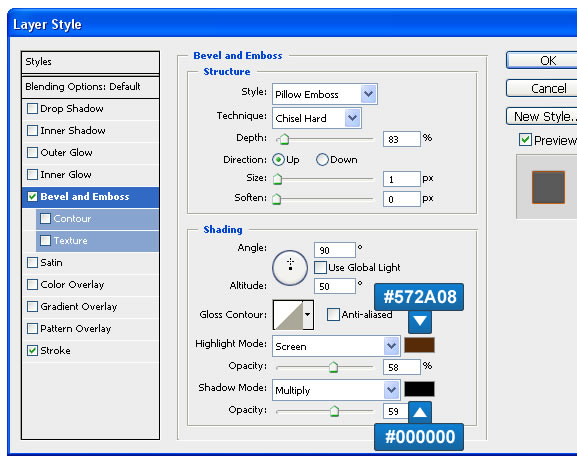
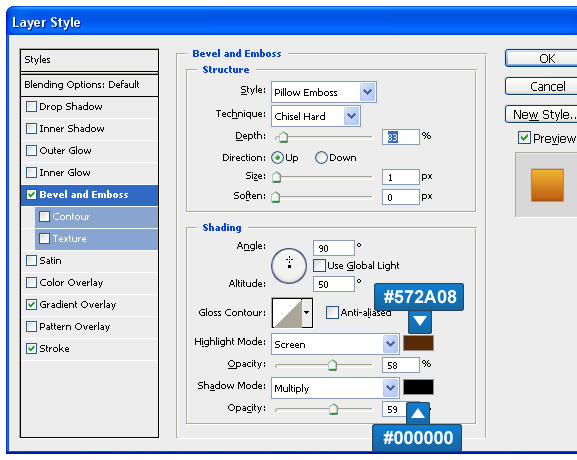
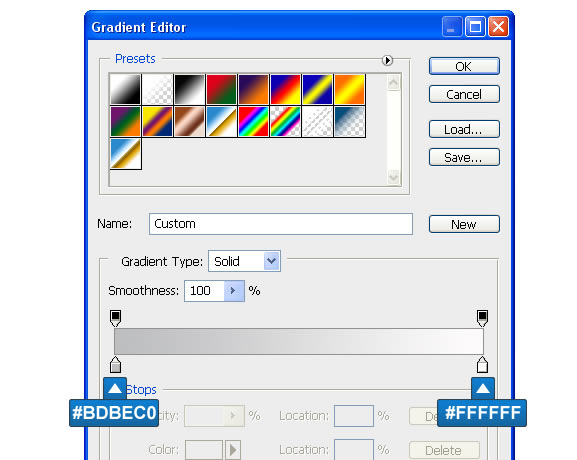
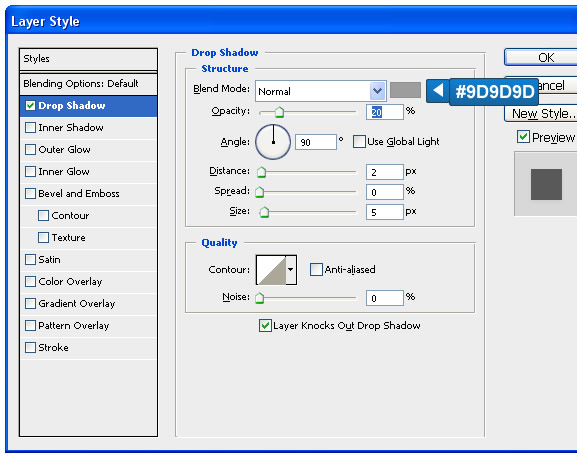
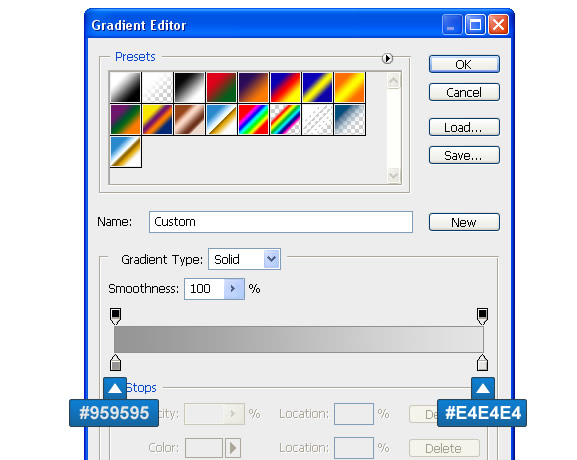
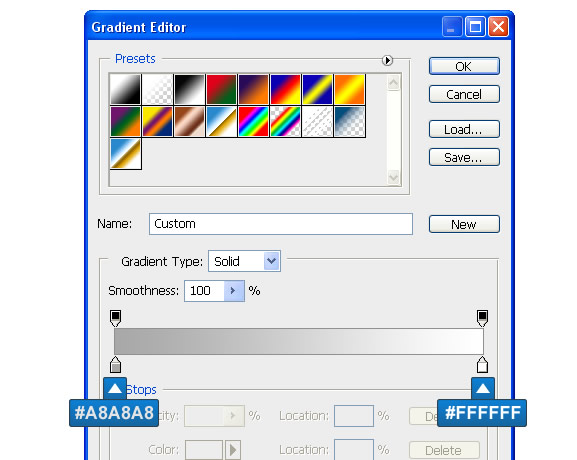
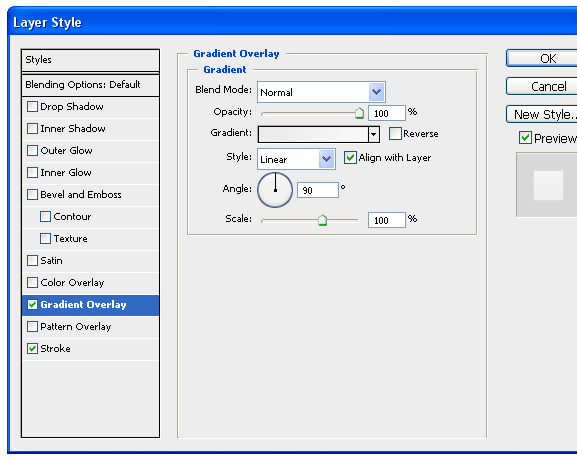
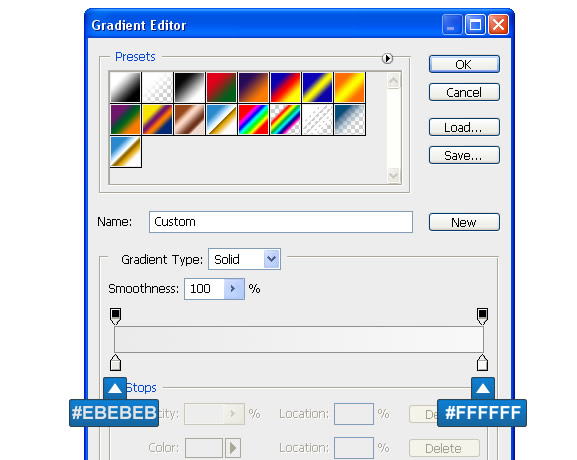
To add gradient background on header section create a new layer called Header bg. Using marquee tool create a selection of 1200x140px then click Shift+Backspace and fill it with any color. Then right click the Header bg layer and select blending options. Apply following settings for gradient overlay according to the following image.

Step 4: Add two pixel lines
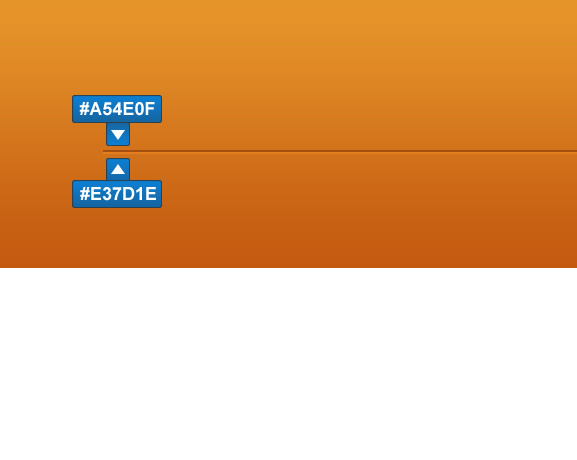
About 80px from top add we will add two one pixel lines. Create a new layer called Line 1px dark, select marquee tool and select 940 x 1 px as shown in the image below.
Fill the layer with #A54E0F, repeat same for other 1px line, call it Line 1px dark and fill it with #E37D1E.
Step 5: Clean up time
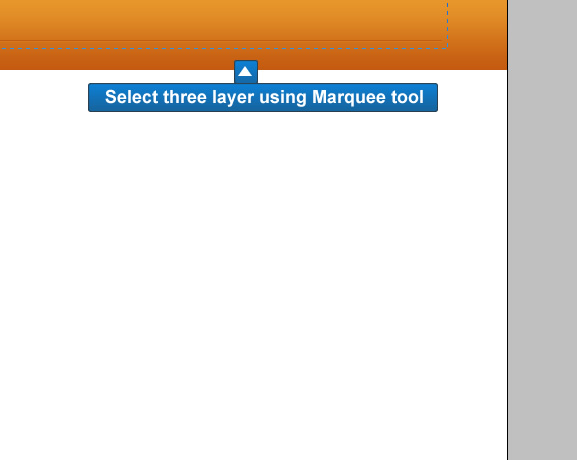
Its good habit to start organizing your file right from the beginning. If you have been working on the same folder (Header bg) all layer we created till now should be in it. Even if you didn’t no need to worry. Lock your Background layer.
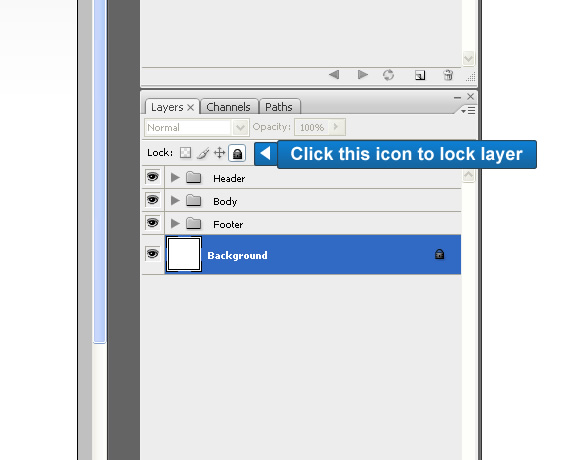
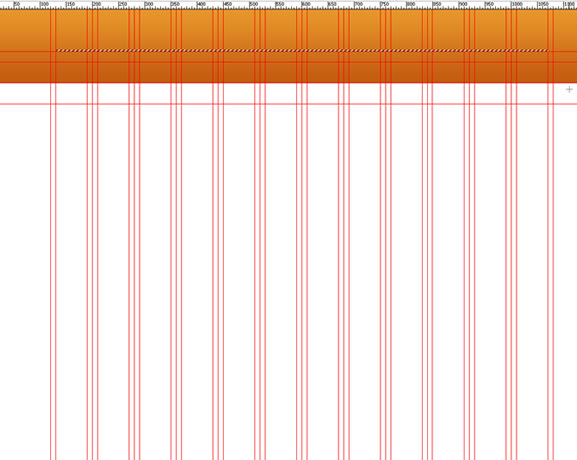
Using marquee tool drag selection from outside of the document so that three layer Header bg, Line 1px light and Line 1px dark are selected. Now in layer palette drag the selected layers to Background folder. From now onwards I will not explain this step to organize file instead just refer to Step 5.
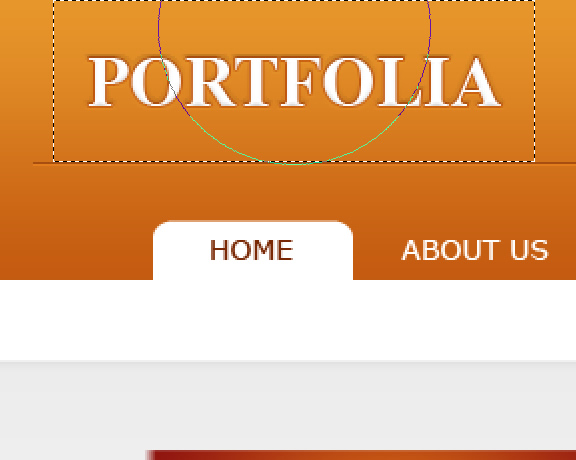
Step 6: Insert your logo
Type in PORTFOLIA just above 1px lines, right click the portfolia layer and add blending option with the following settings.
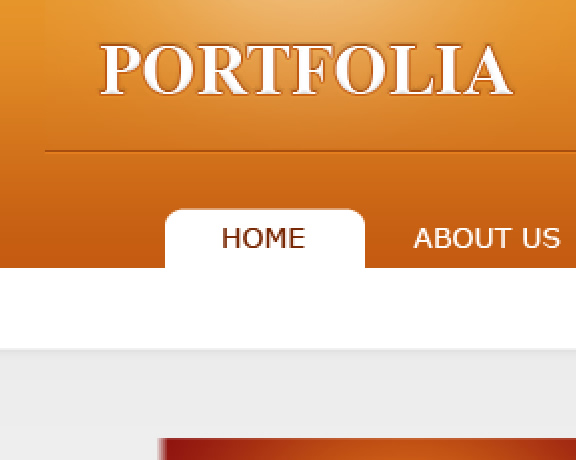
Now we will add fade light behind logo to do so create a new layer call Fade, set Layer mode to Overlay. Using Rectangle Marquee Tool select a rectangle just to cover the logo then choose a soft brush of 175px and set the color to #FFFFFF. Click on the layer few times to give it a fade effect. You should have a light effect behind the logo.
Step 7: Call to action button
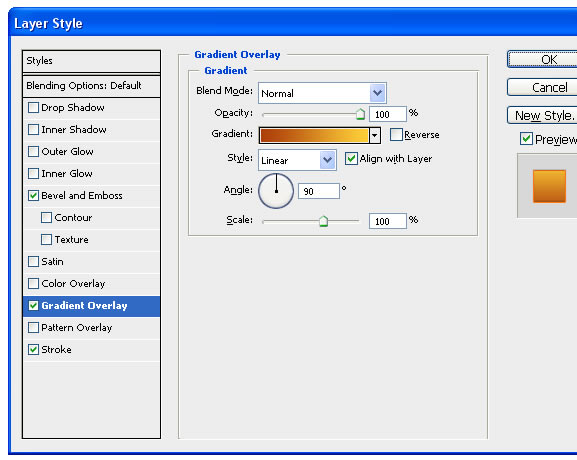
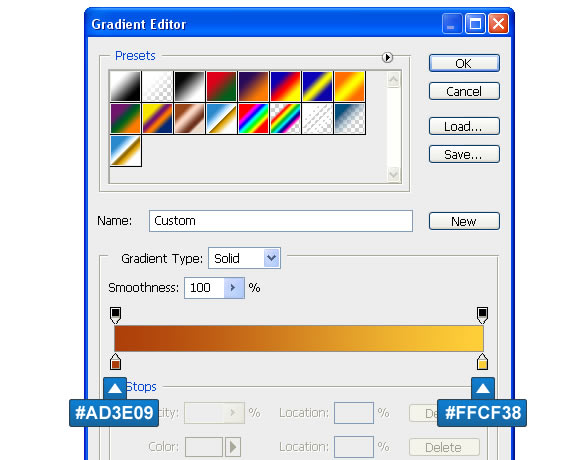
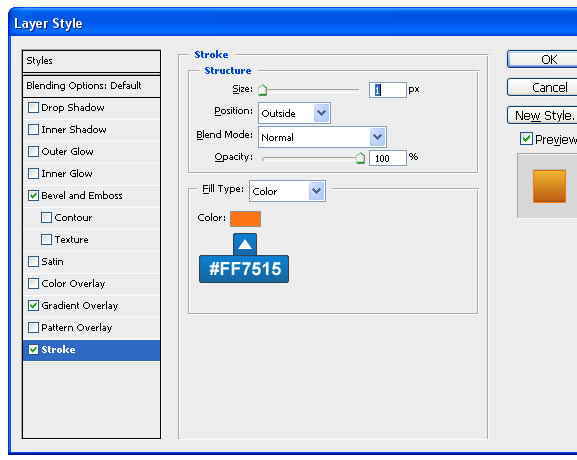
Select Rounded rectangle tool and set radius to 15px. Drag to create a 225 x 30 px round rectangle, name it Orange rectangle. Add layer style with the following settings.
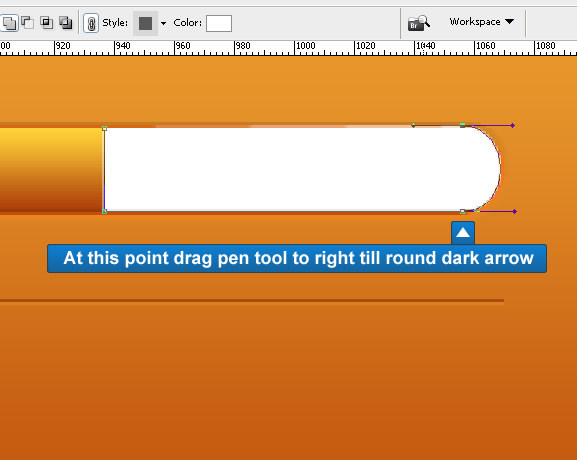
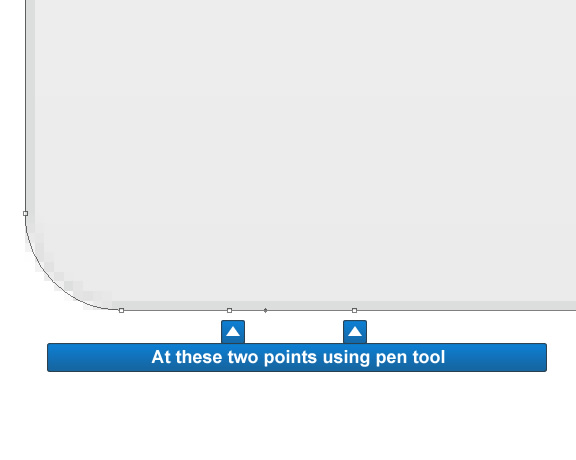
We need to add white/grey gradient round rectangle on right hand side of call to action button. We cannot use rectangle tool in this situation so we will use pen tool to create our custom round rectangle. Select pen tool draw semi circle shape as shown below.
Add following layer settings to the layer.

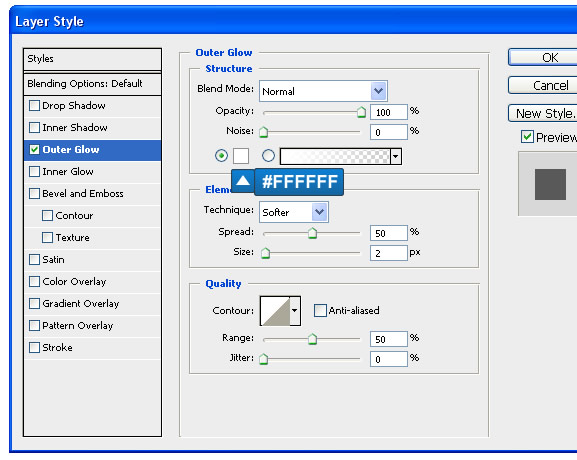
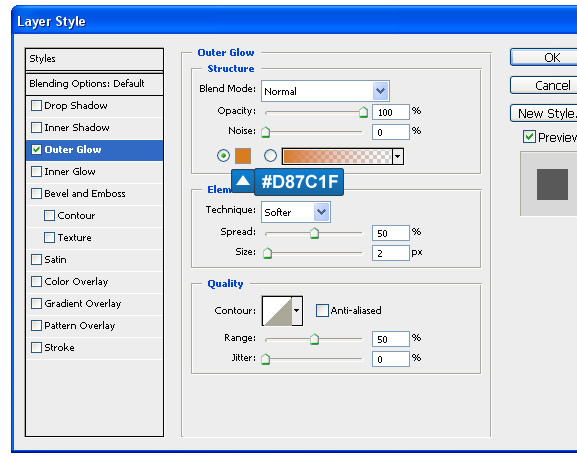
Write a phone number and give a outler glow in the layer style setting.
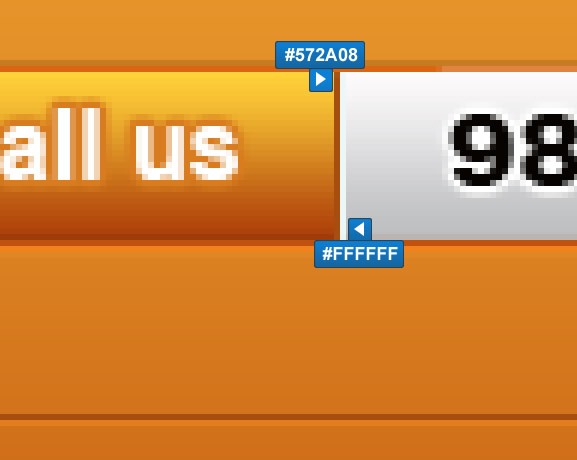
Add call us text and use following setting.
We are almost finished with call to action button 🙂 but need last bit to be added. Add two 1px lines between call us text and phone number.
Create a folder called “Call to action button” and follow step 5
Step 8: Add navigation
Select round rectangle tool with radius set to 10px. Draw round rectangle of 100 x 40px dimensional.
Add text to navigation menu.
- Font-family: Verdana
- Font-size: 14pt
- Font-style: Regular
- Font-color: #FFFFFF

Lets add some shadow below menus to do so create a new layer called Nav bottom shadow. With the help of rectangle tool draw a rectangle of 1200x40px and add drop shadow with the following settings
We are done with Header section so place all the layers and folders inside Header folder except Background layer.
Body Section
Step 9: Image slider
Download three images from SXC
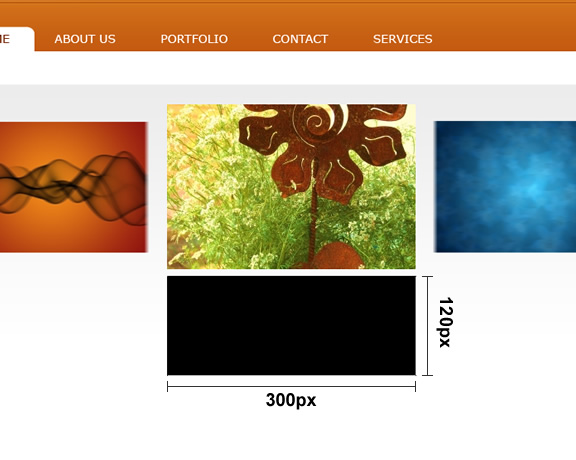
Place the downloaded images on the document. Resize the Sunflower and coriander image to 300x200px and place it on the middle of the document. Resize other 2 images to 240x158px and place it left and right of the document. After aligning images, blur the two small images. Go to Filter-> Blur-> Motion Blur. Set the angle to 180 and distance to 6px. If you want high-quality images for your website, you may consider using a graphic design ai tool. You may also use this undress AI tool.
Now its turn for shadows. Using Rectangle tool create a rectangle of 300 x 120px and fill it with #000000 (black) color.
Then right click on the rectangle and select perspective.
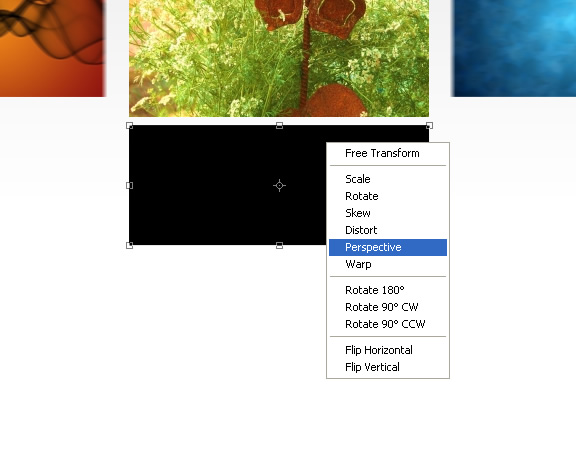
Drag the anchor from one of the top end to make it similar to image below. Now go to Filter-> Blur-> Motion Blur. Set the angle to 180 and distance to 6px. Then go to Filter-> Blur-> Gaussian Blur, set the radius to 5.5 px. During blurring the image a pop up window will ask to rasterize the shape first, click ok.
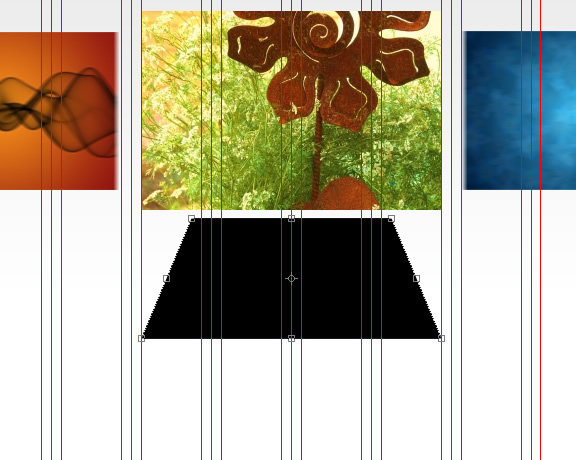
Move the layer behind the image and it should look like the image below.
Repeat same steps with smaller rectangle for other two images.
Step 10: Slider bar
Draw a slider bar for the slider by using a Rounded rectangle tool with radius set to 20px. Again using Rounded rectangle tool with radius set to 8px draw a rectangle of 70 x 26px. Apply following blending option settings to the slider.

Time to add some slider grip to the slider button. Using Rectangle marquee tool draw a 1 x 13px and fill it with white. Next apply gradient overlay setting to the layer, name it 1px gradient line. Replicate the layer 4 times and move copied layer to adjecent sides.

Step 11: Content area
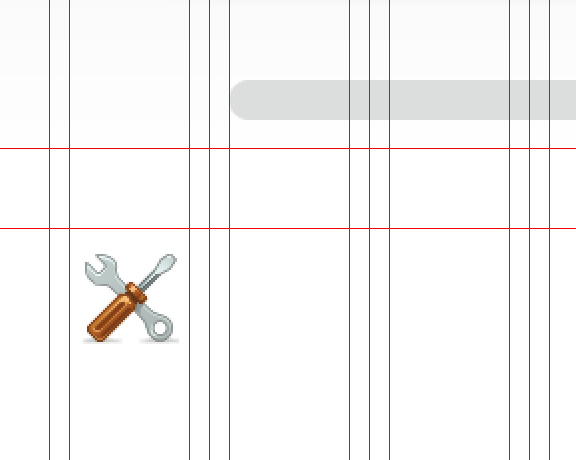
Add two new guides at 480 and 520 px. Then download icons from Pixel-mixer basic set and Pixel-mixer basic set 2. Drop setting tool icon from basic set 2 from the downloaded icon.
Write some text for the title with following settings
- Font: Arial
- Font size:18px
- Color: #E5932A
- Font style: Italic
Do similar for main text with following settings
- Font: Arial
- Font size:13px
- Color: #79807C
- Font style: Regular
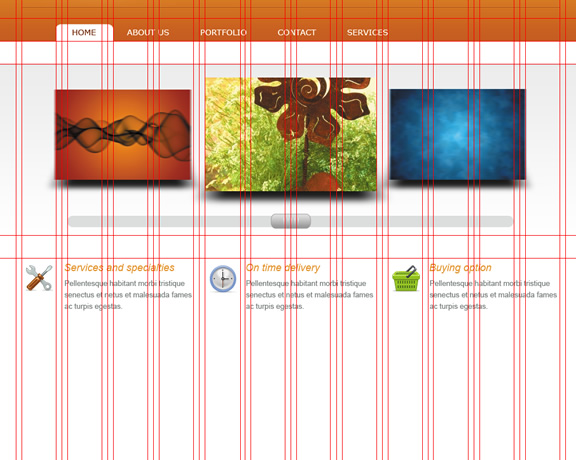
Repeat this step with different text and icons. Then it should look like the following image.
Time to organize file again. Create folder call “Main content” and repeat Step 5.
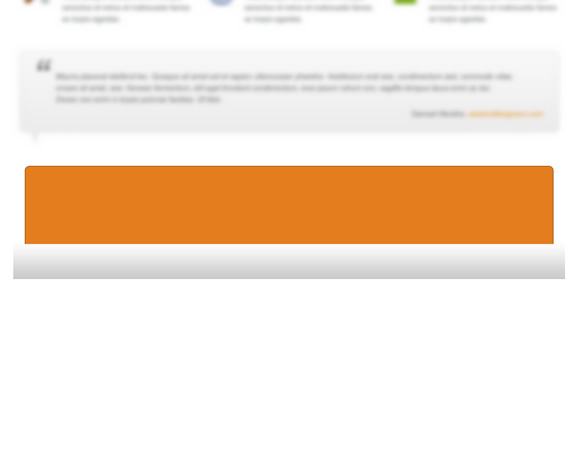
Step 12: Testimonial
Add two new guides at 620 and 660 px. Using Rounded rectangle tool create rectangle with radius set to 10px (Width: 940px and height: 140px). Apply following setting to the layer.

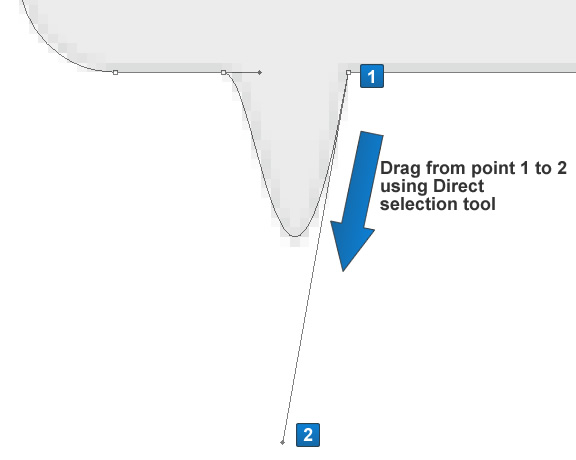
Using pen tool add two points on the rectangle then using direct selection tool drag the right point as show on below image to create kind of arrow.
For quote sign type ” with following settings
- Font: Arial
- Font size:80px
- Color: #6E6C6C
- Font style: Italic
Do similar for main testimonial with following settings
- Font: Arial
- Font size:13px
- Color: #79807C
- Font style: Italic
Then add name with same settings except Font style: Regular and for the website link use Color: #E5932A.
Step 13: Footer
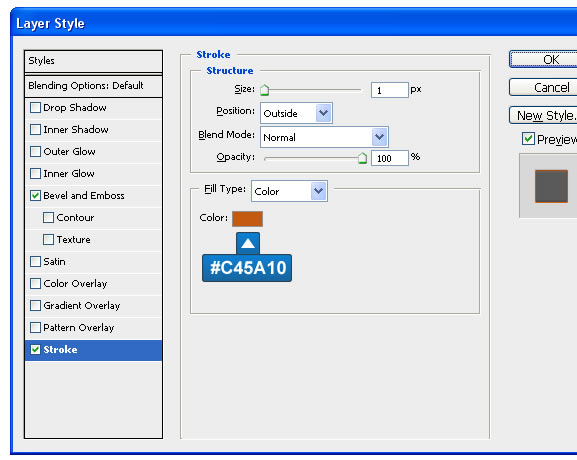
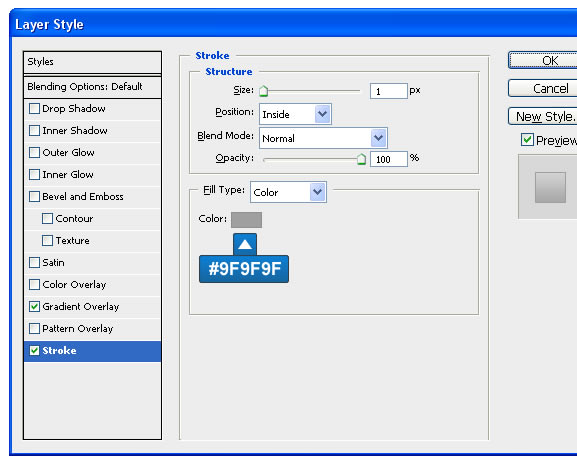
Draw a rectangle by using a Rounded rectangle tool with radius set to 8px of 920 x 170px and color #E37DLE. Apply following stroke option settings to the rectangle. Name this layer “Box frame”.
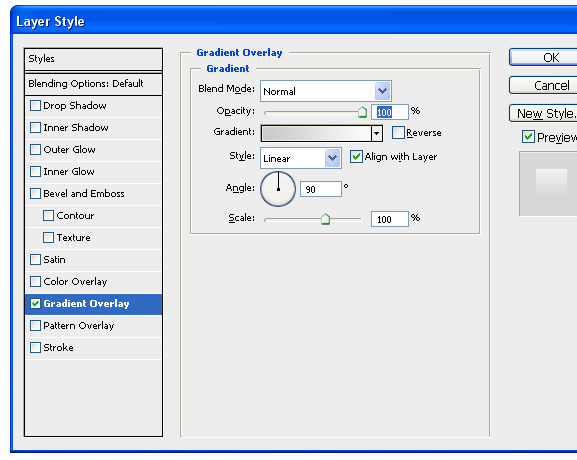
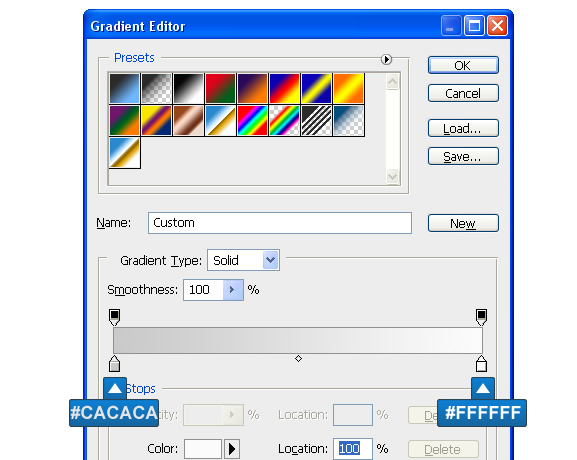
Now at the bottom of the round rectangle create a rectangle of 940 x 60px (name this layer “Front shape” and apply gradient overlay as shown in image below.
It should look like this.
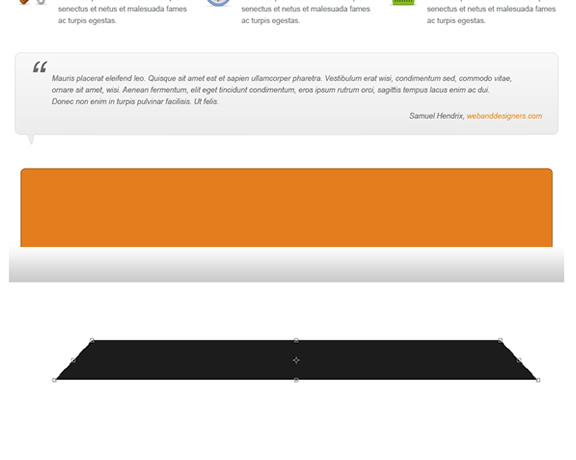
After creating basic framework for footer, add shadow underneath the framework. To do so draw rectangle of 850 x 70 px name it Shadow. Click Edit -> Free Transform then Right click on the rectangle and select Perspective. Drag the top point on one side of the rectangle towards another point till it looks like the image below.
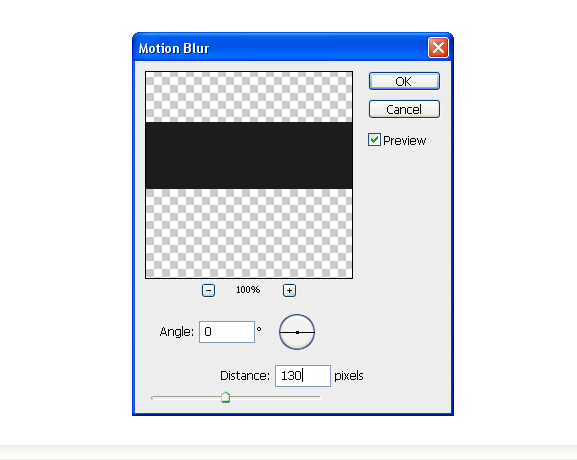
Go to Filter -> Blur -> Motion Blur and apply following settings.
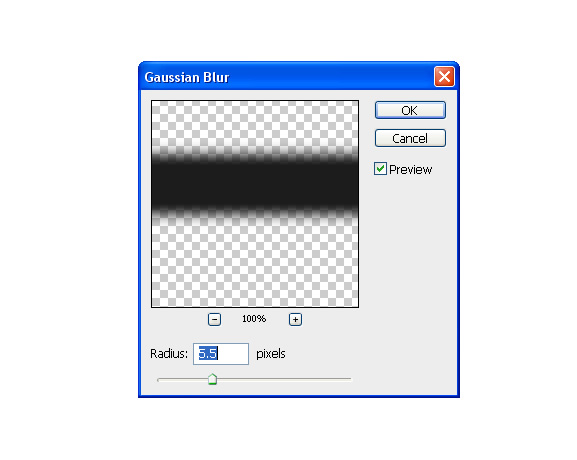
Again go to Filter -> Blur -> Gaussian Blur
Move the Shadow layer underneath other footer layer.

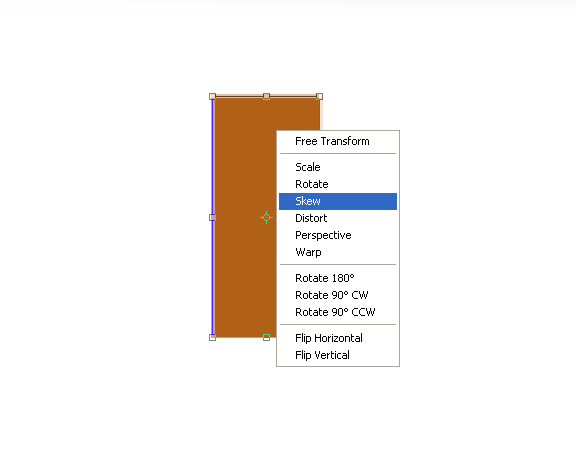
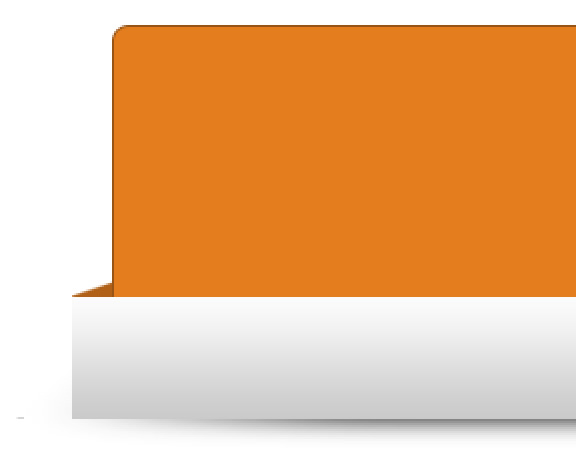
To add in bit 3d effect add new layer “Box angled shape left” of 26 x 60px color it with #B16117. Click Edit -> Free Transform then Right click the rectangle and select Skew. Holding Alt key drag the top right point in upward direction.
Move the layer just below the gradient rectangle. Do same for the right side except drag the top left point in upward direction.
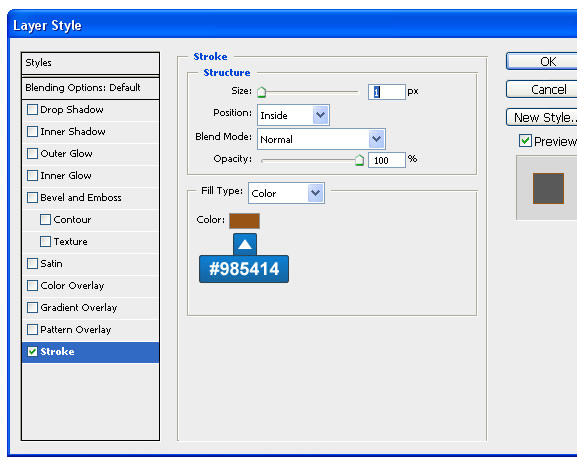
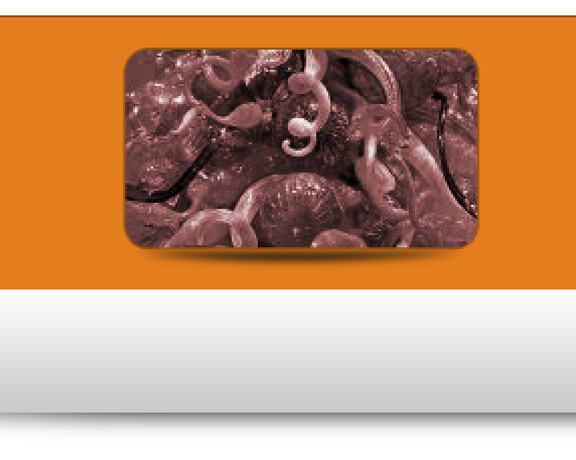
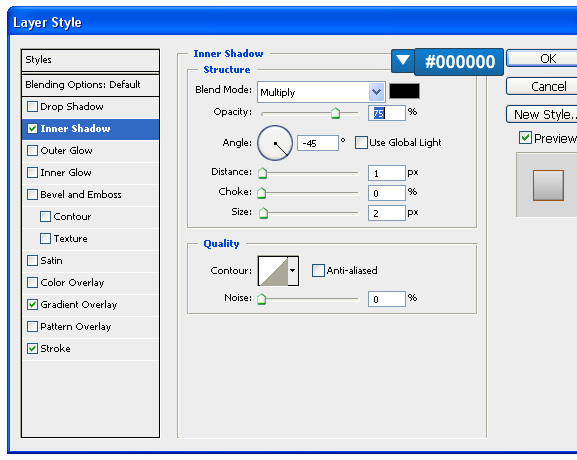
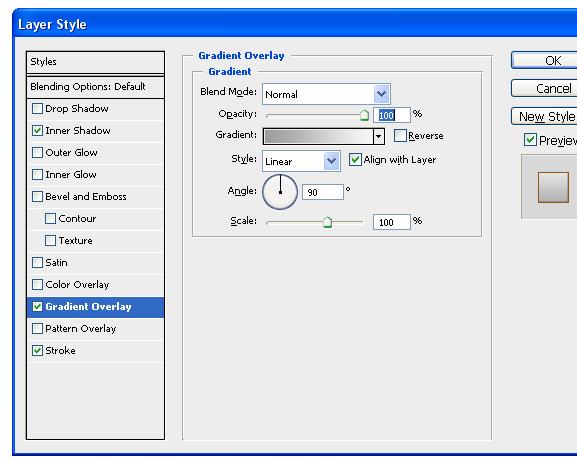
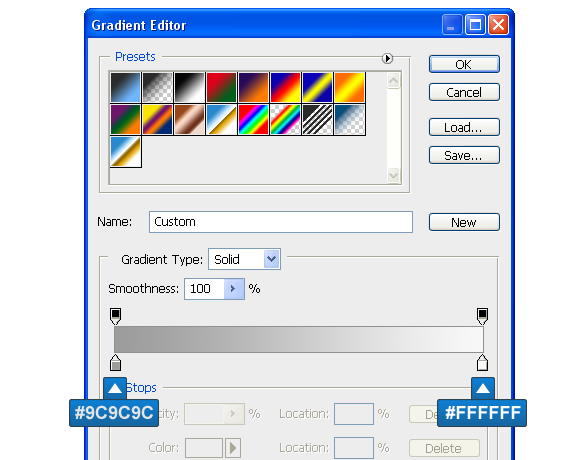
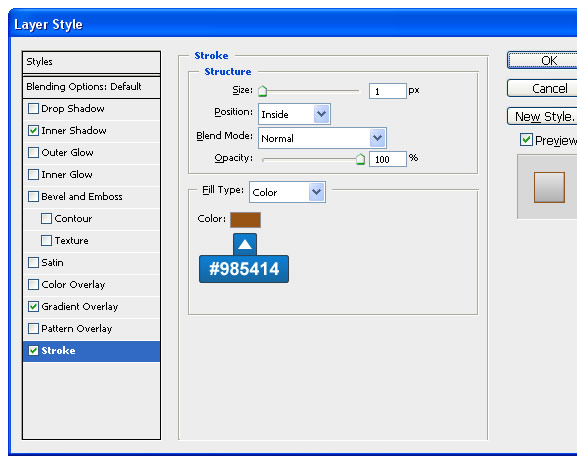
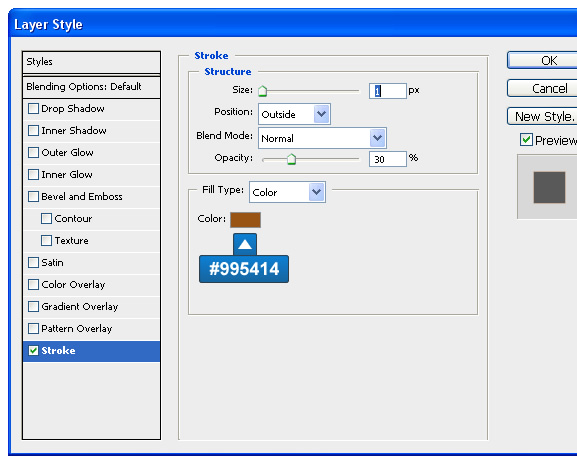
For the scrolling thumbnails start by adding a new rounded rectangle (name it Image shape) of 175x100px fill it with #FFFFFF and apply 1px stroke of #985414. Download image MAM Chihuly Show 5 from SXC and place it above Image shape layer. Select the image layer then go to Layer -> Create clipping mask, this will mask the image with the rectangle layer below it. Adjust the image as needed. To show a uplift effect on the thumbnail add a Shadow layer and using Ellipse Tool create a small ellipse and go to Filter -> Gaussian blur with Raidus 1.3px you should now have a thumbnail image with shadow like the image below.
Repeat same steps to create two more thumbnail images.
Last step 🙂 of this tutorial is to add arrows for the thumbnails. Create a circle (name it Arrow circle left) of 19 x 19px, apply following setting to the layer.
Above the circle layer add new layer and call it “Arrow left”. Add a small arrow and apply stroke setting as shown below.
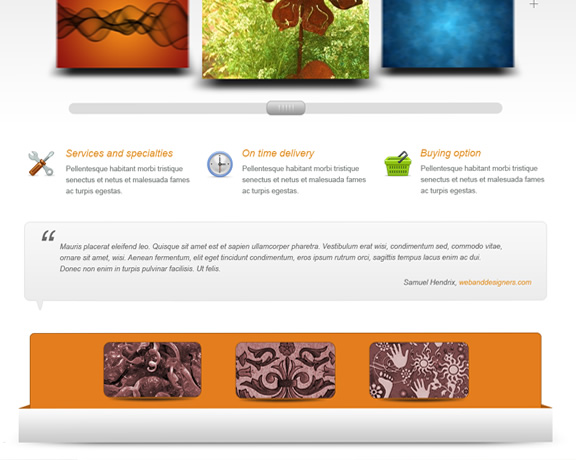
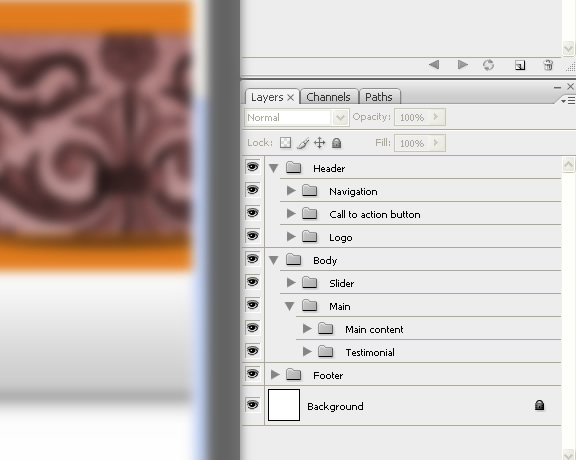
Last but not the least do not forget to organize your layers. This is how mine looks like.
Conclusion
Using simple techniques we can achieve fresh and creative templates. Here is the final image how the template should look like. If you have any queries pour in your precious comments below, till then cheers from my side.